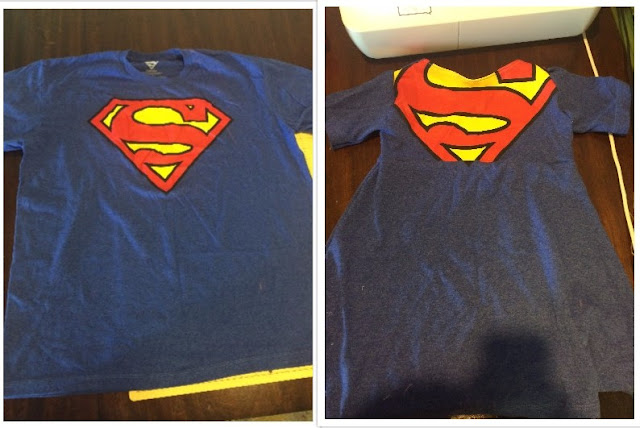
Before & After

What you will need:
XL or larger T-shirt
1 sheet of regular 8x11 size paper to make bodice pattern
thread
scissors
sewing machine
So, for the bodice, I kind of just eyed it, but we can try to figure out an exact measurement here.
Take a piece of paper, (I used construction paper, but whatever you have handy works, as long as it's standard letter size.) and fold it in half horizontally, like a greeting card.

This is what it needs to look like. If you feel like you can free hand it, go for it! Otherwise, measure 8 inches up and 3 inches over and make a mark there. Then, measure 7 inches up and 5 inches over and make another mark. Now, 7 inches up, from the left hand side, draw a slightly curved line to your first mark. Next, draw a straight line to your next mark. Last, bring your line down to the right hand edge of the paper about 2 and half inches up.
Starting to look like a bodice? If not, this pattern is tried and true: http://www.burdastyle.com/patterns/child-summer-frock

Let's get started!
Step 1:
Turn your shirt inside out. I did not do this in the photos, but it would have saved me a little trouble if I had.
Lay your t-shirt flat and cut 14" up from the bottom. I used pinking shears to try to prevent the fabric from rolling, but regular scissors will do the trick.

This will be the skirt, and this is what it should look like:

Step 2:
Fold your strip of fabric in half along the long side, making sure the edges are even.

Line your bodice pattern up along the top left hand side of your folded skirt, and make a mark on the skirt where the pattern ends.

Next, you're going to draw a straight line from the mark you made at the top of the skirt to the bottom, slightly above the pre-sewn bottom hem.


Cut along the line.

Step 3:
It's time to start sewing! I'm using white thread so that you can see what I'm doing, but it would be best to use a matching thread color. Unfold the newly cut skirt piece and sew together the sides, making sure your shirt is inside out. Use a zigzag stitch, reversing on each end to secure it. Leave a 1/2 inch seam allowance.


Once your skirt is sewn together, set it aside. We will come back to it after we create the bodice.
Step 4:
Okay, I am going to preface this by saying it would have been MUCH easier if I had used the readily available, perfectly constructed collar that the shirt already has, but I wanted to keep the Superman logo for the dress, so I made my own collar. You should feel free to cut your bodice along the t-shirt collar to make it exponentially easier for yourself.
Take the top part of the t-shirt and fold it in half. Make sure it is inside out. Then, line up the bodice pattern on the t-shirt. I lined mine up on the bottom where it was already cut, but it would be fine to line it up to the collar at the top.


Trace the pattern and cut it out. This is what it should look like (unless you are using the premade collar in which case it will look slightly neater than this):

Sew together the sides, making sure your project is inside out. Notice the area that is sewn in this picture, ignore the pins for now.

Step 5:
You can skip this step if you are using the premade collar. Here, we will pin and sew the collar. Starting from the center, carefully fold the collar down about a half an inch, then over again and pin. Then working your way up on each side, fold it over, over again, and pin. Continue until you reach the top. After you have it pinned, sew along the collar with a straight stitch and repeat on the other side.


Step 6:
Making sure the collar is lined up, sew together the top straps.

Step 7:
Let's cut out the sleeves. Lay the remainder of the original t-shirt flat, folded in half so that both sleeves are stacked, and place the bodice you just put together on top of it. Line the top strap up with the top of the t-shirt sleeve. Draw a line from the top strap, down the armhole to the side of the bodice, then over to the end of the sleeve. It's sort of hard to see in the picture, but I hope you can figure out what I mean.

Cut out the sleeves that we drew. This is how they should look:

Step 8:
Sew the sides of the sleeves using a zigzag stitch, making sure they are inside out.


Here is the tricky part. Turn the sleeves right side out. With right sides together, so the bodice is inside out and the sleeves are right side out (this is important), stuff the sleeve that we just made into the sleeve hole in the bodice, lining up the seems. Pin together first at the seem, then around the rest of the way.

Sew around the sleeve using a zigzag stitch. Repeat on both sides.


Step 9:
Finally, we will attach the skirt to the bodice. With right sides together, put the skirt inside of the bodice and line up the raw edges. Pin the bodice and skirt together starting at the seems. Then, sew around the opening.


Step 10:
Press the seem that attaches the skirt to the bodice down, and turn the dress right side out. Put it on your favorite little one and get ready for hours of twirling fun!


I hope you like this tutorial! Please comment with any questions you might come up with.

No comments:
Post a Comment